

DIY projects save you money while boosting creativity—discover budget-friendly home improvement tips on our DIY website!
You can save so much money with DIY projects. Here are some of my popular posts:
How to Install an Electrical Sub Panel for DIYers and Save Thousands of Dollars
How To Repair Drywall (4 Ways)
Tips For Lowering Your Winter Heating Bill Costs
We’re going to show you how we added air conditioning to this house for the very first time, as it has never had it in its 35 years of existence. Not only that, but we also saved the homeowner approximately $8,000 in the process, and we accomplished it all today. I’m here with my buddy, Dave from DIY HVAC Guide. You’ve probably seen this channel before. Dave is our guide, walking us through this entire process. In case this is something you’re interested in doing, it’s easier than you might think, and will save you so much money. And the best part is, we’re doing this at a customer’s house, where we’re going to surprise her at the end with the fact that we’re doing all of this for free.

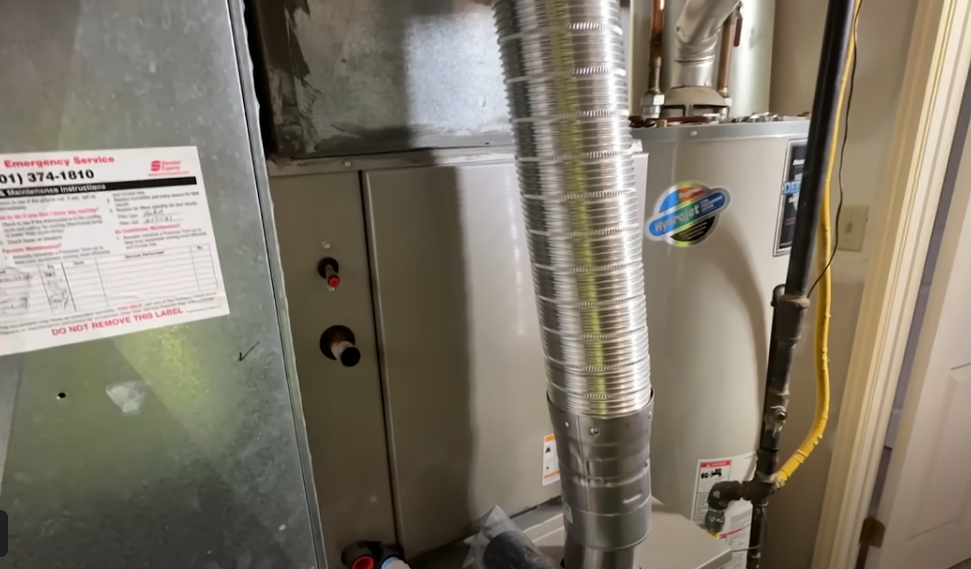
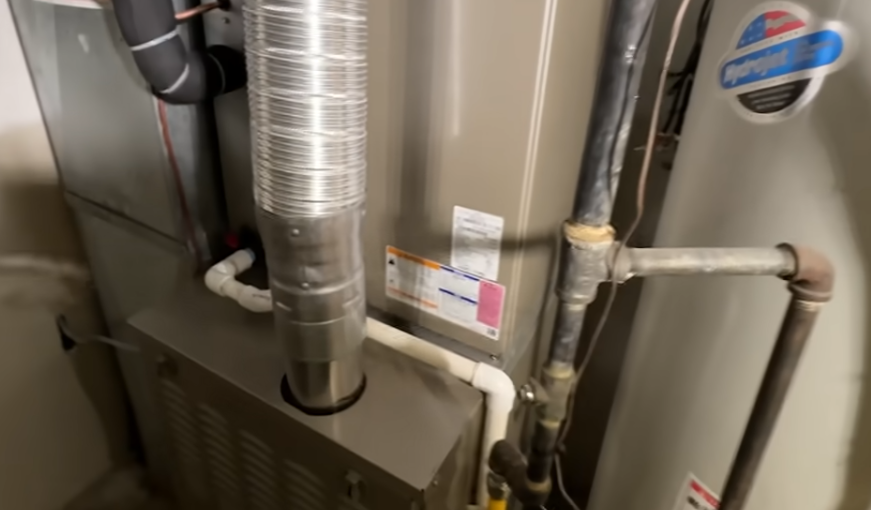
The basement has its existing furnace, and the coil was replaced in 2019, so the coil is already set up. We don’t have to do any ductwork, but I do have other videos that show how to build this transition. Now, part of the challenge is finding the best way to run refrigerant lines out to the condenser and where to put the condenser. So we’ll go outside and show you the ideal location.
Something else you want to factor in is, this is the utility room, and you notice all of the floor joists are going one way. We wanted to put the unit in another room because it’s closer physically, but the location out here is not ideal. It’s going to be a real challenge because the floor joists are going this way. So we’ve come up with another solution that will be better.
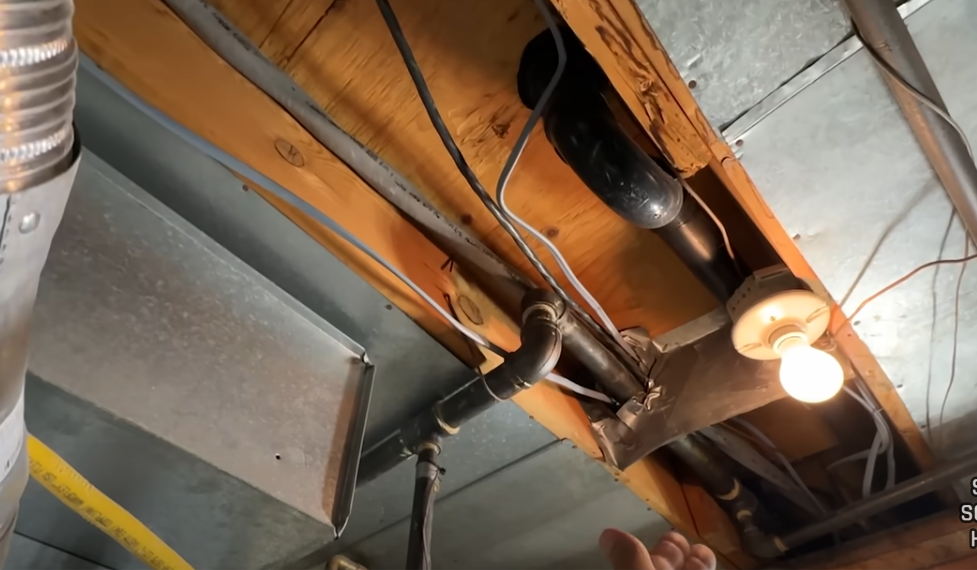
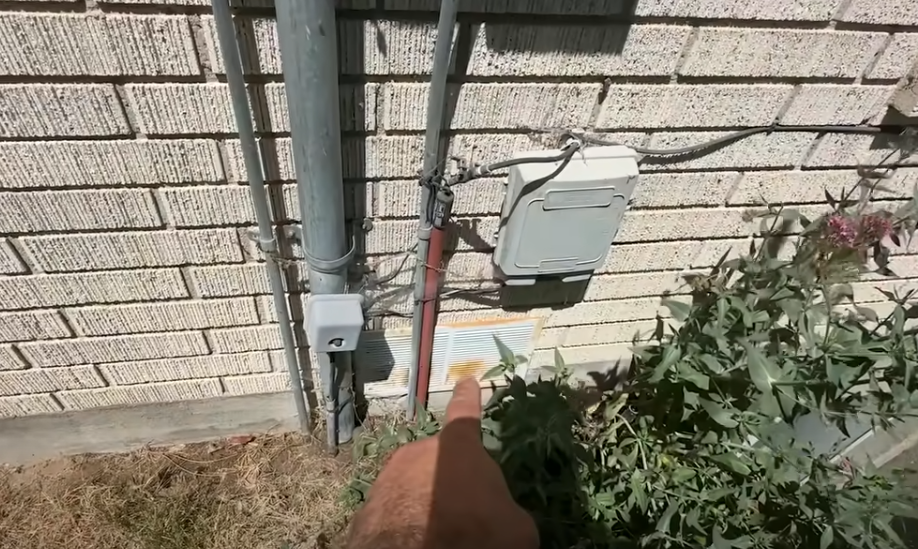
If you look right here, you can see outside, and we’ll show you where this goes outside. This is using this as a fresh air supply to get air into this utility room, so we can now run our line set straight through this floor joist in this cavity. And it’s going to be way easier than trying to run it through here and fishing it through there. That was going to be a nightmare. Not to mention, we would have to run a new breaker and run electrical out there with a disconnect. We will show you out here how it works and where we’re going to put it now.
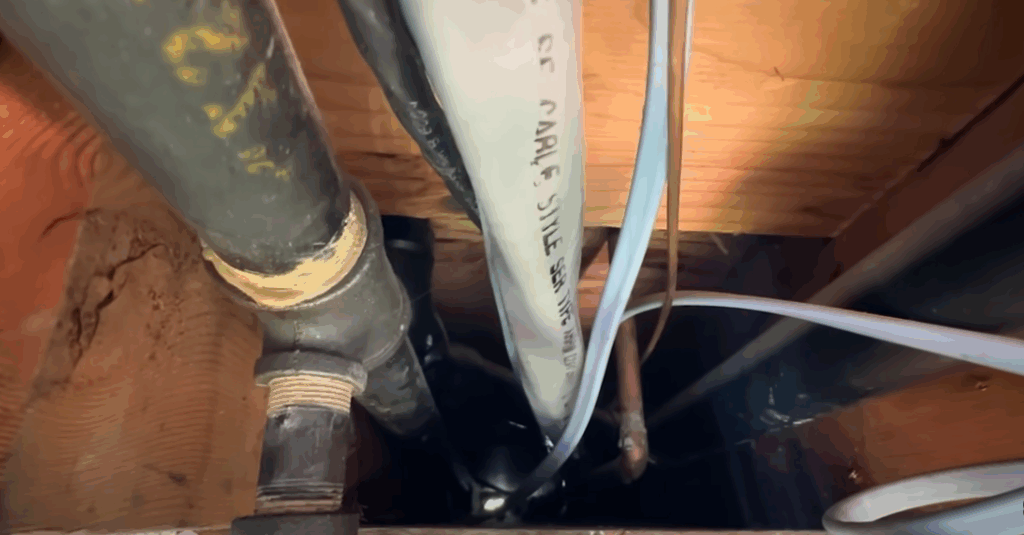
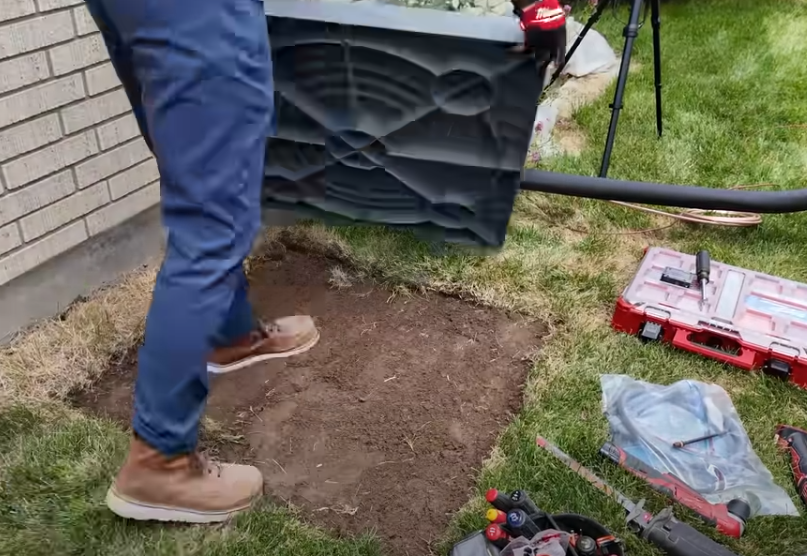
Originally, we were going to put the condenser here, but as you can see, this is a covered space, not to mention, they want to use this space, you know, in the summer months, in the spring and fall, to entertain. So this is where we’re going to be putting it. It’s in this area that nothing is going on. The noise doesn’t matter. And as you can see, that’s the fresh air that we saw light through from that same cavity. So we’re just going to cut a hole about two, three inches here, run it out, do a 90 with our refrigerant lines, we’re going to set a pad here and put our new condenser right here.
This is the new condenser. It’s an AC IQ three-ton condenser. Part of this home is in the basement, so normally we would have sized this a little bit bigger, but because it’s a basement, three ton is going to be the perfect size for this.

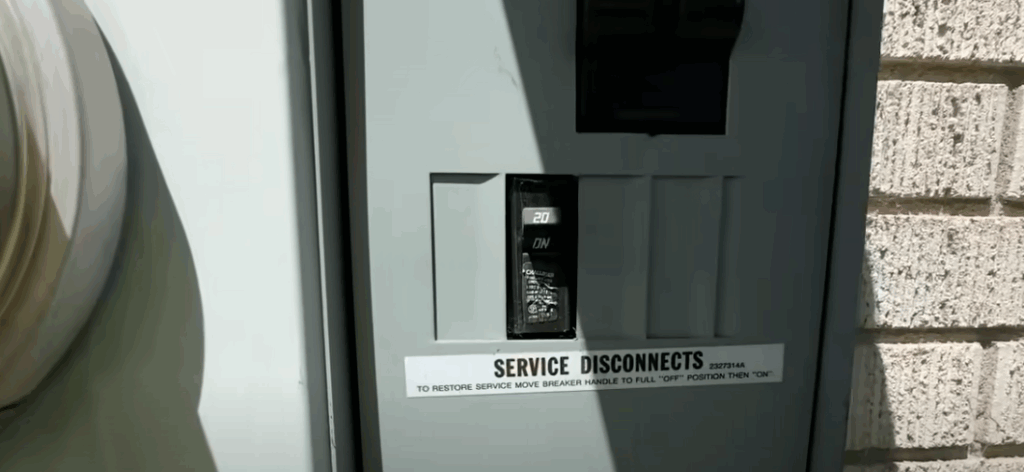
The panel is right here and has additional slots. So we’re going to put a 30-amp breaker on those slots, label it AC, and as long as it’s within six feet of this breaker, we don’t have to have a disconnect here, which is a bonus.
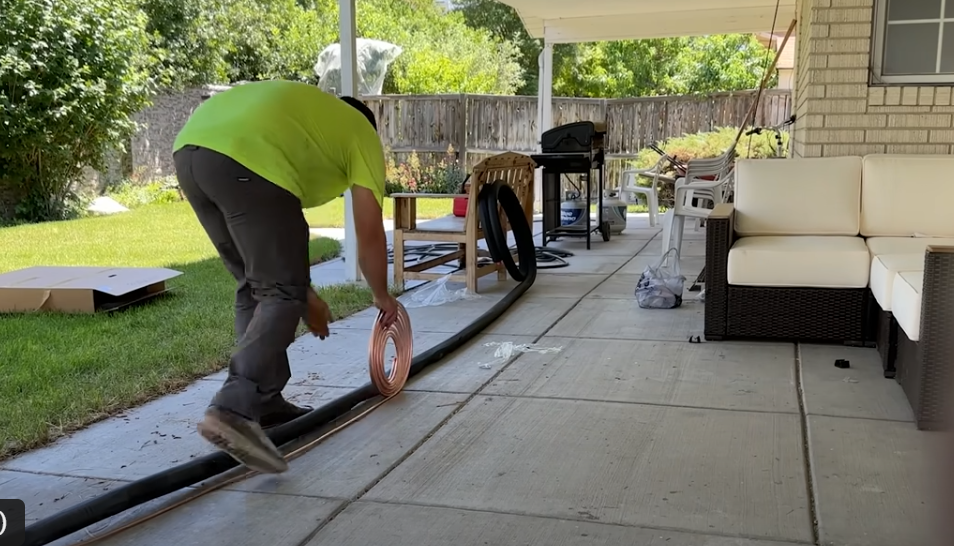
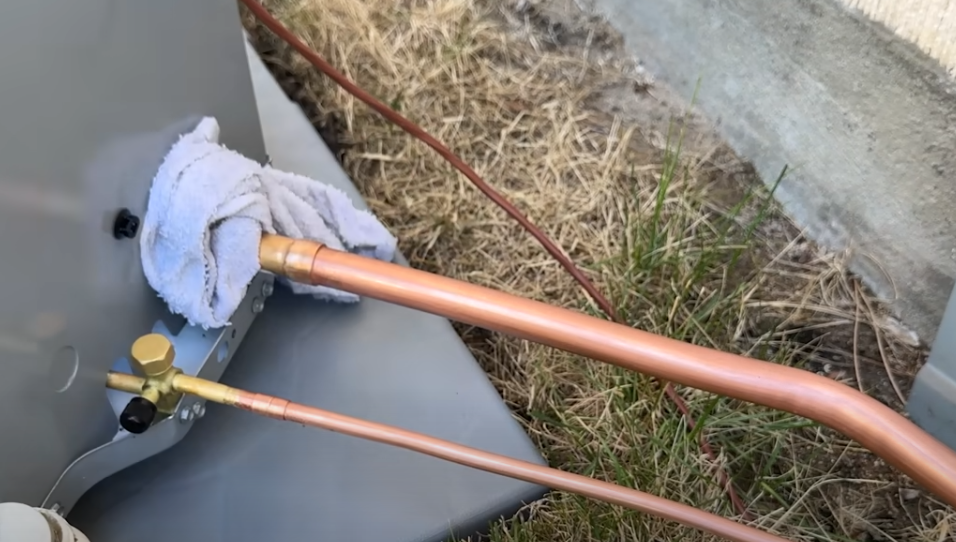
This is our line set. This is 78 and three-quarters. And what we’re going to do here is we’re simply going to orient this to where we can hold this one end with our foot, and we’re just going to roll it out. And that ensures that this comes out as one long straight piece. And then what we’re going to do is we’re going to tape the three-eighths line, the thermostat line as well, all together, and then we’re gonna feed it through that Chase. And it’s gonna be super easy. Something else to note is we’re going to give ourselves about an extra five feet or so and tape it, that way we have some extra to make our attachments.
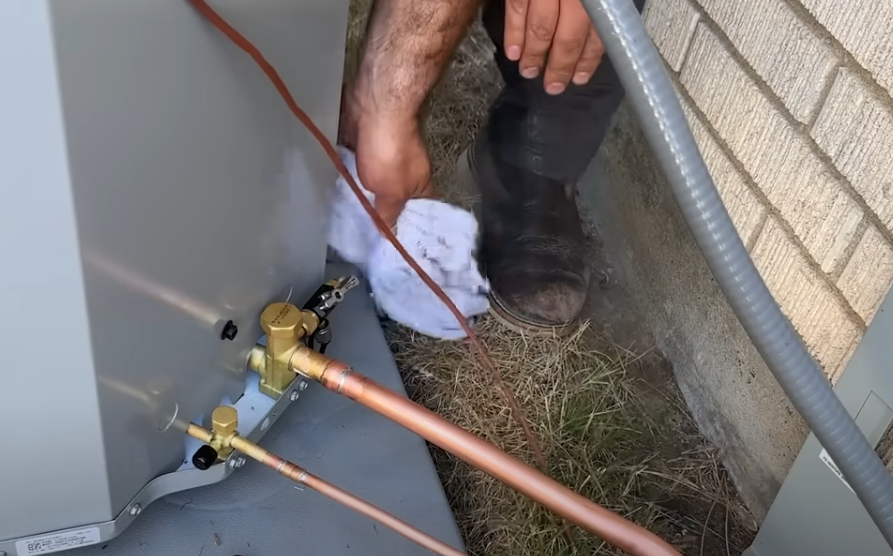
We’re going to do a gradual bend, and then we should be pretty close. We might need to feed in a little bit more, but he should be super close here. Now, something else that’s very important is we want to ream this out with a special reaming tool. You can get this on Amazon, and basically, as you can see, we’re just removing and kind of expanding the inside of this, because when you run your tubing cutter, it shrinks this down and kind of restricts the refrigerant that will flow through that. So we want to open all of our lines, the larger line, as well as the smaller line. And you always want to make sure that this is tilted down so that none of this is getting in your pipe. So this one’s going to go right here.
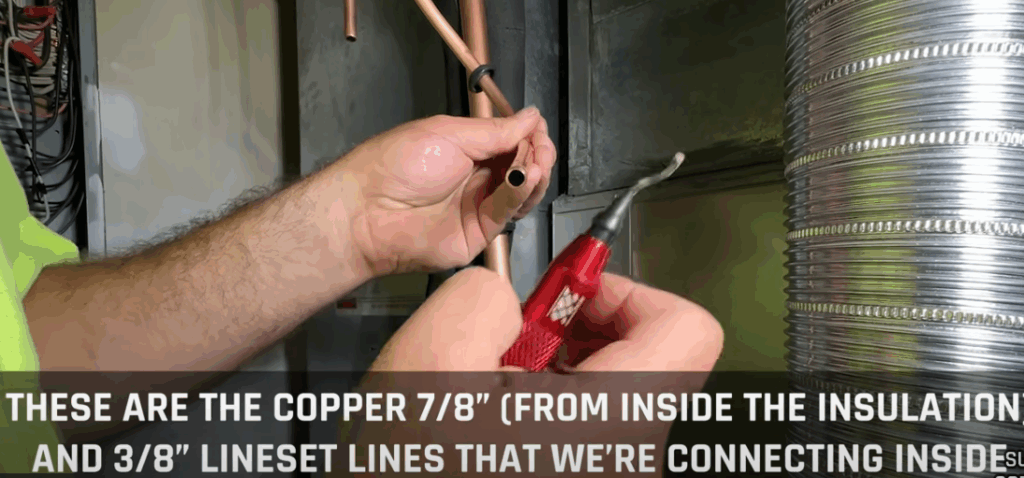
Now I’ll go ahead and throw our filter dryer in, and we’re just doing a dry fit here to make sure that everything looks good. When we have everything dry-fitted, I’ll remove our liquid line, and we’re going to show you how to prep these lines for our stay bright eight. So the first thing we need to do is just clean it up with some scotch brite or some emery cloth ends, and then once all of our joints have been cleaned up, just like that, we’re going to apply our flux.
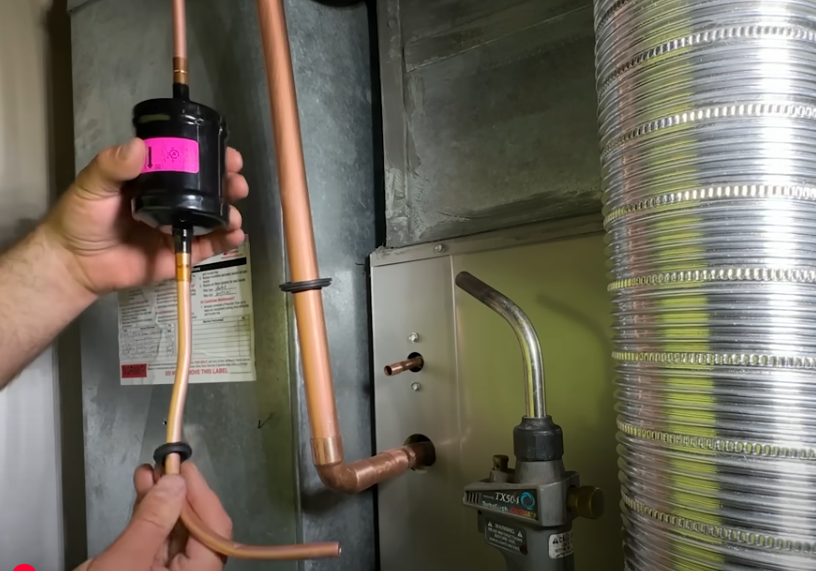
This is called stay bright eight, and this is a specialty soft solder that’s specifically designed for HVAC applications. Now there are several advantages to stay bright eight, and the first of which is that you don’t have to flow nitrogen through these lines. This does not get nearly as hot as brazing, which is typically about 1200 degrees. So you don’t have to worry about soot getting built up in these lines. And the other advantage is that you can use a simple map or a propane torch and use this. You don’t have to use the yellow tank. You can use the blue propane torch with a simple torch head like this. This only gets to about 400 degrees, so it’s very quick and very easy and DIY friendly.
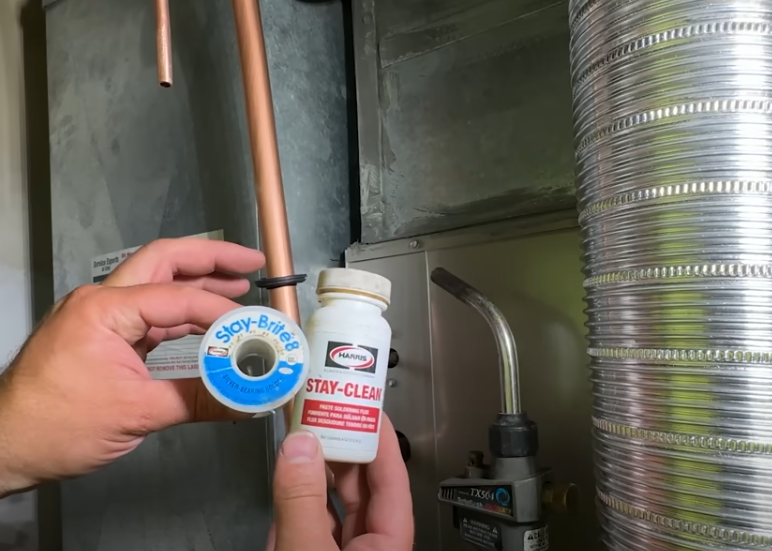
Now that all of our fittings have been sanded and cleaned up nicely, we’re going to go back through with our Stay Clean. This is our flux, and we’re just going to use a little amount of this. You don’t have to use a ton, and I only install this on the male end. So for this one, we’re just going to go not quite to the edge there, just almost to it all the way around. And then when you feed this in, it will push that flux towards the outside, so a minimal amount will get into the lines. I’m going to go through and put this on all of the male ends, and we’ll go ahead and put our filter dryer in, again with the arrow pointing towards the furnace or towards the coil. I’ll do the same thing on our suction line, and then we’ll be ready to solder.

Something else to note is that this unit came with these rubber boots. You’ll notice I slid them up so they’re away from the heat, and then once everything is cooled, I’ll slide that back in to seal this from air coming out.
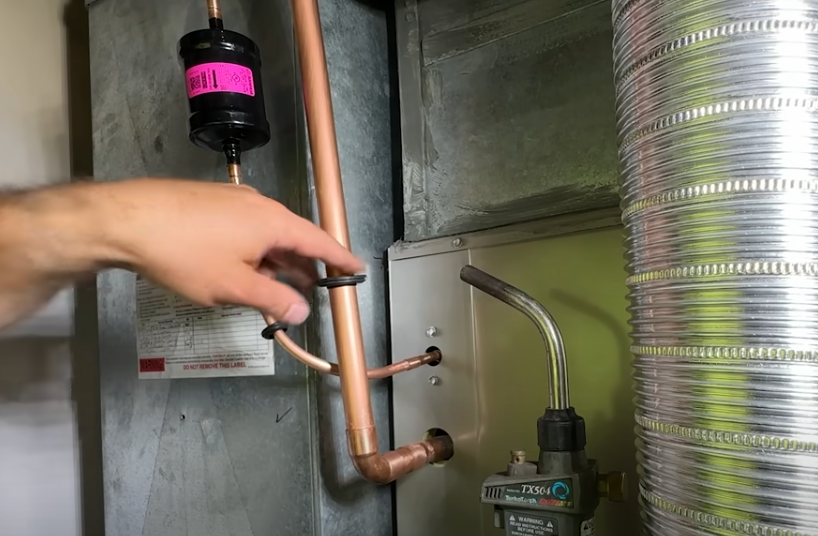
When I start soldering that we’re going to start on the opposite side, heating it, and we’re going to feed the solder in through the other side, making sure that the solder gets pulled where that heat is going. And then we’ll also move the heat source to the other side, feed in a little bit more to make sure that we have a good seal all the way around. He’s applying the solder to the opposite side that he’s heating, and he just uses this little swiping motion, does that a few times until he notices that the solder melts appropriately. Then he removes the heat and continues applying that. He’ll work his way around the pipe until he gets a great seal. He’s also getting a good build up on there, so the solder actually kind of gets sucked into the joint, but he’s making sure, not only does it get in the joint, but it builds up around the joint too. And then later on, we’ll see that he’s going to sand it all back down, apply a little bit more flux, and then move on to the other joints. I think a lot of people are often intimidated by sweating pipes, but it’s just as easy as it looks. And this is something that you have some forgiveness with. I’ve sweated pipes in the past and was a little intimidated myself, but it goes pretty smoothly. And keep in mind that you will use more solder for a larger diameter pipe than you will for a smaller pipe. So you’ll notice when he moves to the 3/8 inch pipe, there’s very little solder that’s being used.
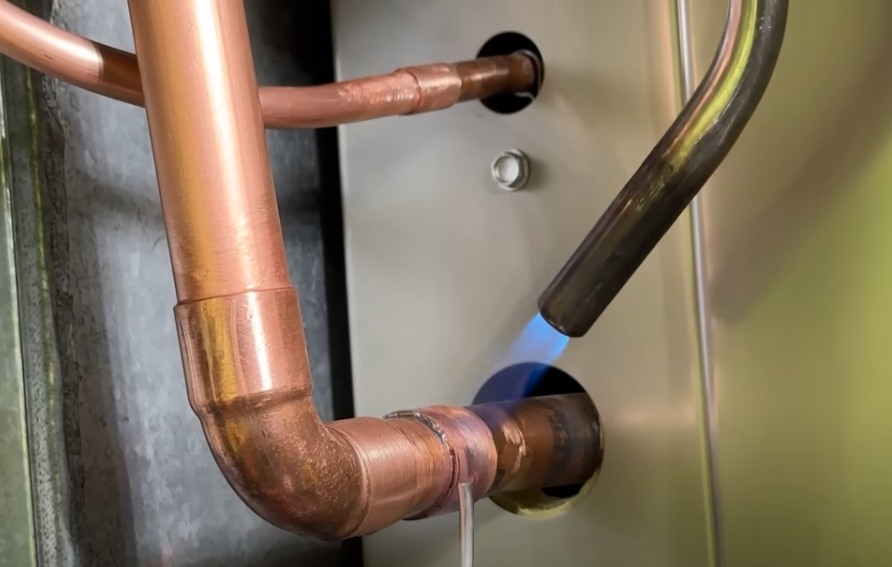
We wiped all of our joints down, and everything looks good. We’re going to go back through with a mirror and make sure that we have good coverage all the way around.
This is a three-quarter threaded fitting, and it goes to a female. So we’ll put our female, so we’ll put our male three-quarter PVC in here, and then just 90 over and 90 down. So what Dave’s building here is called a condensate pipe. This makes sure that any water that accumulates via condensation inside the unit doesn’t get stuck in the wrong place. And it’s got a nice path to flow to. There is a drain in the floor in this utility closet, and this one was a little bit different than what I’ve experienced in the past. It’s actually sitting underneath the water heater. So he’s building a nice PVC pipe that goes out the exit around that main vent that you see in the middle of the screen here, down and into the floor where there’s that drain pipe that it can all drain into.
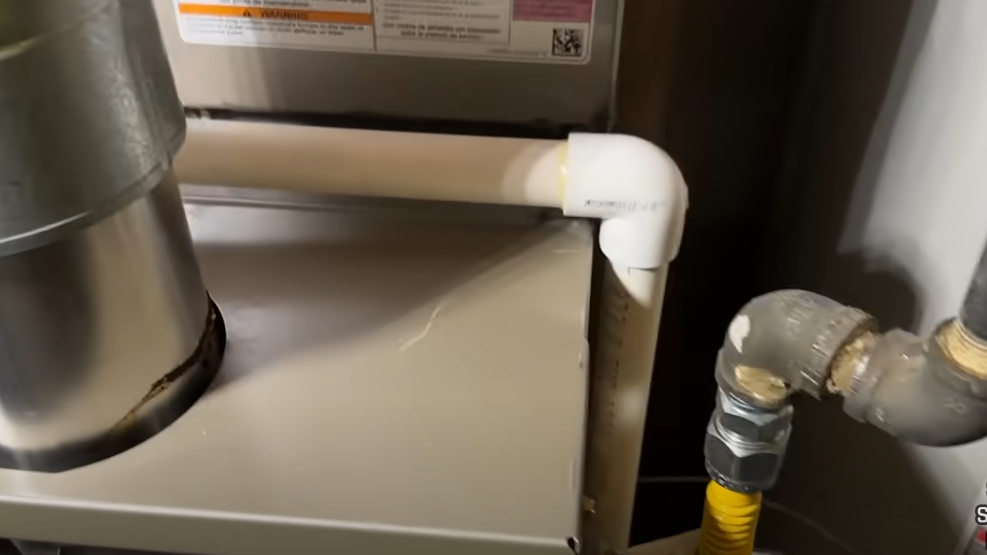
The pipe comes down and goes into the drain that’s under this water heater. So that part is finished. Our line set is also finished up. We’ll do our soldering outside and then a pressure test.
At this point, you might be wondering if I was helping at all, and I promise I was trying. While he was doing a lot of the stuff in the basement, I was picking up different supplies that we needed, many of which you’ll see later on in the video, including this three-foot by three-foot condenser unit pad. I didn’t know this was an option; that’s pretty handy. So instead of pouring a concrete pad and waiting for it to set, all we had to do was go buy this thing, and then I used a flat end shovel to mark a template around it, and then dig out what is essentially sod so that I could have a nice spot to set, set that into the grass. And then I was able to level it, just using a small level and then make sure everything sat totally flat. And once that was done, I could put the condenser unit itself onto it and push it down, and everything was good to go. This was a super easy way to get a nice, solid base for our condenser unit.
I am now able to focus on the electrical side of things, and I totally lucked out because there was a 20-amp single-pole circuit breaker in place there that wasn’t actually in use. So I was able to switch it out with this two-pole 30-amp breaker, which is what we use to power the unit. From there, I knocked out one of the little knockouts at the bottom, and then used this six-foot, half-inch Ultra whip, at least that’s what some people call it. Basically, it’s an outdoor-rated whip, and it’s also got all of the wiring inside of it, which makes this convenient and easy. These cost about 17 bucks. And if you can see past my bony elbow there, you’ll see that I took the locking nut off, fed the wires up, put the locking nut back on, in place, and I have this handy little set of Klein nut adjusters. Maybe that’s not the technical term, but little tools that use the teeth on the locking nut to pull the rings around and tighten them up, but they work well. These are optional. You can use a regular pair of pliers to do this, too.

A lot of times, you’ll see me use my Kinipex Universal wire strippers. They can take really any gauge wire, stranded or solid, and strip them quickly and easily. And then once I do that, I use my lineman spyers to twist the stranded wires together to try to make them more like one solid wire. From there, I hooked the red and the black up to the two poles of the circuit breaker. And it doesn’t matter which order, they’re both pumping out 120 volts, so that’s fine. And then I put my green ground into the ground bus bar.
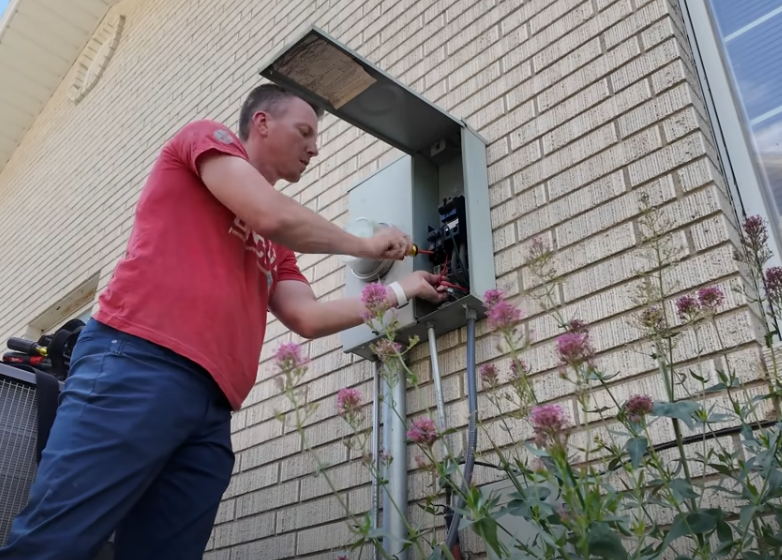
I was able to feed the other end into the unit, and we’re doing the same thing over here. We put that locking nut over the top, and then we tighten that thing into place. I’m going to cut the wires to length, both the ground and the hot lines. Once they’re in place, I’ll twist them together and connect them to their terminals, just like before. It doesn’t matter if you put the red on the left or the right, or the black on the left or the right; it’s all the same. They all get their 120 volts per leg, as is the case with a lot of the tools you’ll see us using here. You don’t have to have specialty tools like my universal wire strippers, but this is how your product should end up looking in the end with the two legs and the ground.
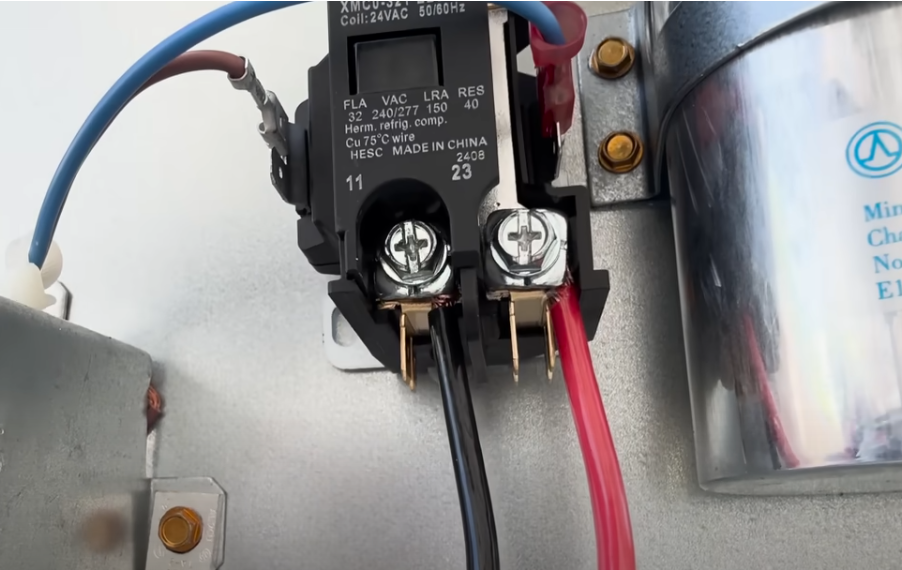
From here, I used my multimeter just to make sure that we had good power coming in at the source as well as at the unit. And it’s hard to see, but 232 volts was coming into each with our power situation all squared away. It was time to focus on those communication wires that we put in before this is the 18 five cable, and I’m just connecting the red wire to the brown and then the white wire to the blue, and that provides the signal to tell the unit to turn on. You can, of course, use wire nuts with this, but I chose to use some two-port Wago connectors to make this fast and simple.

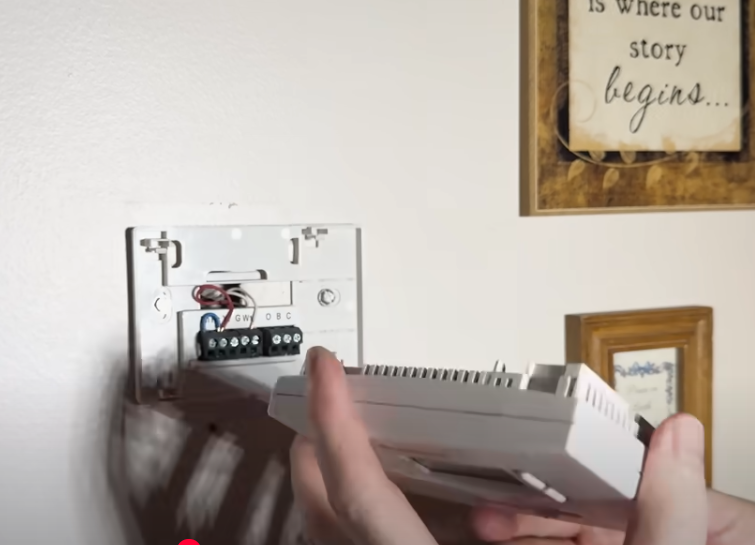
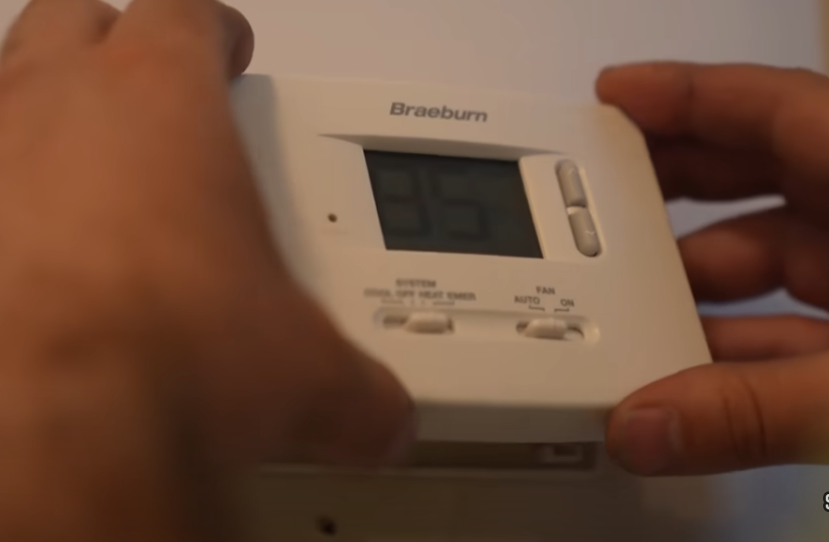
As you can see, this furnace is only set up with two wires, one for 24 24-volt supply and one for the call for heating, because this was a furnace-only setup. I’m going to be adding a fast stat 5000, and it has a unit that will extend via Bluetooth. It will send a communication for the Y terminal to call for cooling and the C terminal, which we’ll need for certain thermostats. It will send a signal via Bluetooth to the thermostat, and it communicates nicely with the system. That way, you don’t have to pull a new wire and go through all that mess. So we’ll show you how to do that.
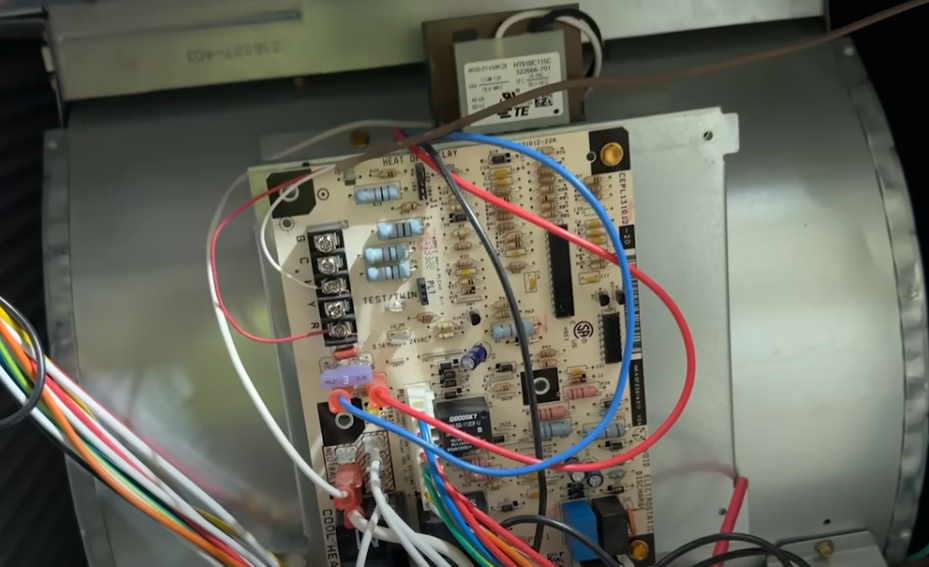
The Fast Stat 5000 comes with a pretty thorough manual, and it’s got some great diagrams showing how to connect a two-wire setup and a three-wire setup. I realized it probably didn’t make a lot of sense for me to show the specifics of how ours is set up, because everyone might be a little different depending on your board. So first we’re going to start with the board down here at the furnace, and make sure everything is connected, as explained in the diagram, close everything up, and make sure we’re good to go. Then we can move up here to the thermostat and just make sure to remove that carefully. And then we want to expose all of the wires, remove each of the wires there, and then pull off your mounting plate. And once the mounting plates are off, the challenge we have now is to be able to figure out how to put the little transmitter into the wall.
This needs to go behind the drywall. But, of course, this couldn’t be simple, because everything else in this project was pretty straightforward, so I had to introduce some challenges, right? So I ended up having to figure out how to put this into the wall, because those two wires were coming out of the middle of two 2x4s. So I had to drill out the space that was just a little bit bigger than the transmitter, being super careful not to connect with those wires, because that would ruin the whole thing. So you can see right at the end. I think I barely just pushed on those, but everything was still intact and in good shape.
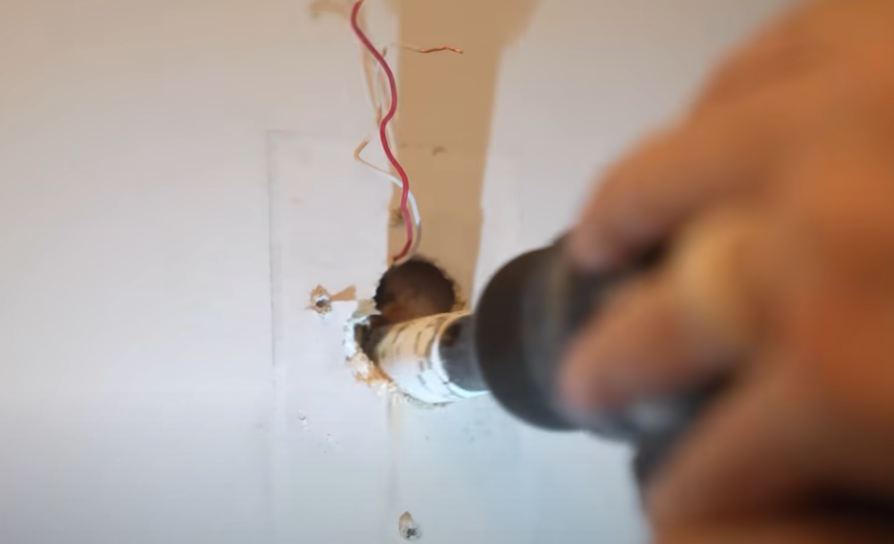
Then I put the little transmitter in and got all my wires poking out I mounted them through the mounting plate. Once I had the mounting plate put on again, I was able to snip the wires to a reasonable length, because there just wasn’t enough room for all of them, and then stripped the ends of each one, and then got everything wired up. As you can see, it was 85 degrees inside the house.
We have our whip connected, which will fasten and make it look nice. We have our pad. We dug out a square of the grass and leveled this out, placed our pad and unit on top. Now we’re going to focus on getting our refrigerant lines connected. We’ll cut the insulation and use our Bender tool to get it right where we want it, and then afterwards, we can come back and put our insulation back on.
I have experience using pipe benders for metal conduit, but this was my first time seeing someone do this for H back lines, and Dave’s a pro at this and made it look pretty easy. He has a set that he’s using that is a little more expensive, and there are some less expensive sets.

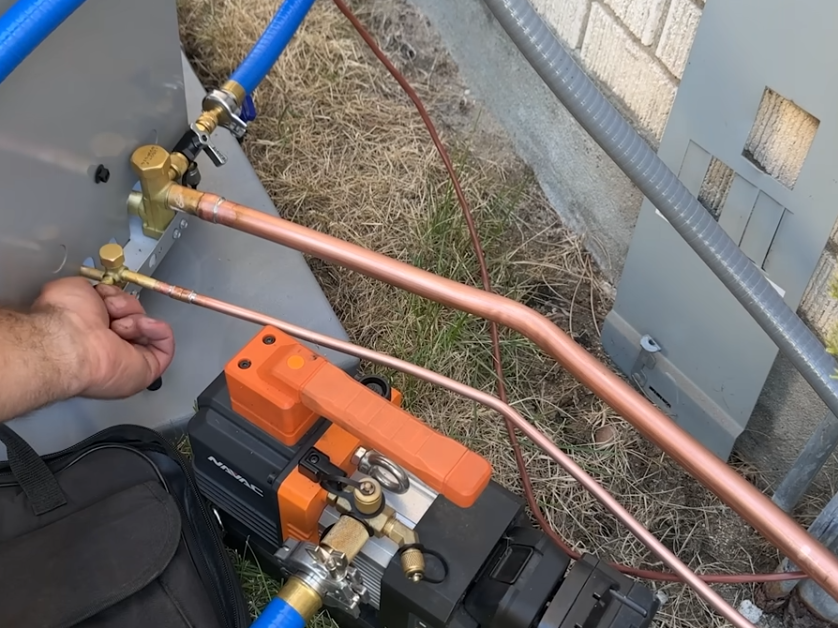
We’ve made our bends here. We’re going to go ahead and prep our fittings and our pipes here so that we can “Stay Brite” this in. The first thing we’re going to do is use our Stay Clean Flux. And again, I’m not going to use a ton of this. Something to keep in mind is that you can find these ACR fittings on supplyhouse.com, but don’t mistake these fittings for plumbing fittings, because they’re not the same. The ACR fittings are a little bit thicker than regular plumbing fittings, and they’re rated for a lot more pressure.
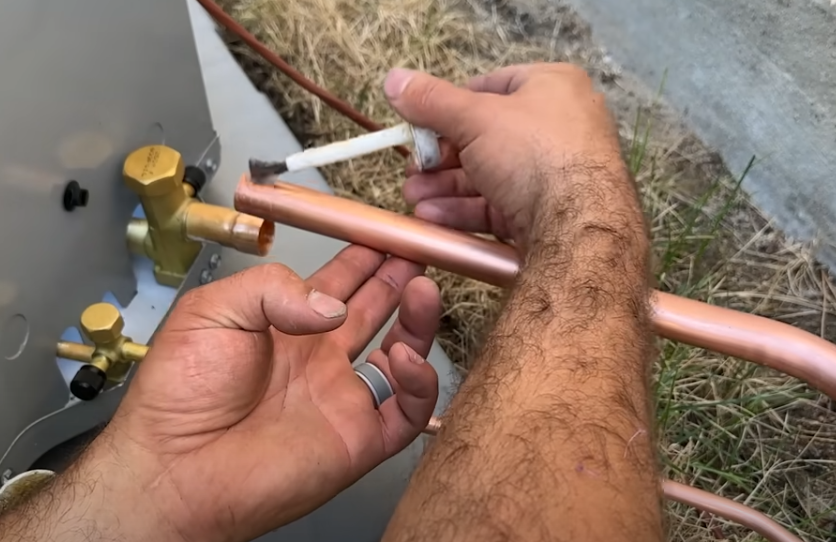
Both of these lines are ready to go. What we’re going to do is use a wet rag to kind of prevent this heat from messing with our valve. You’ll note, typically, I don’t do this. I don’t think it’s super necessary, but I’m just going to use an extra layer of caution here. We’re in and out so fast that it doesn’t really have time to soak in and mess up the valve. And I have yet to mess up one of these King valve seals.
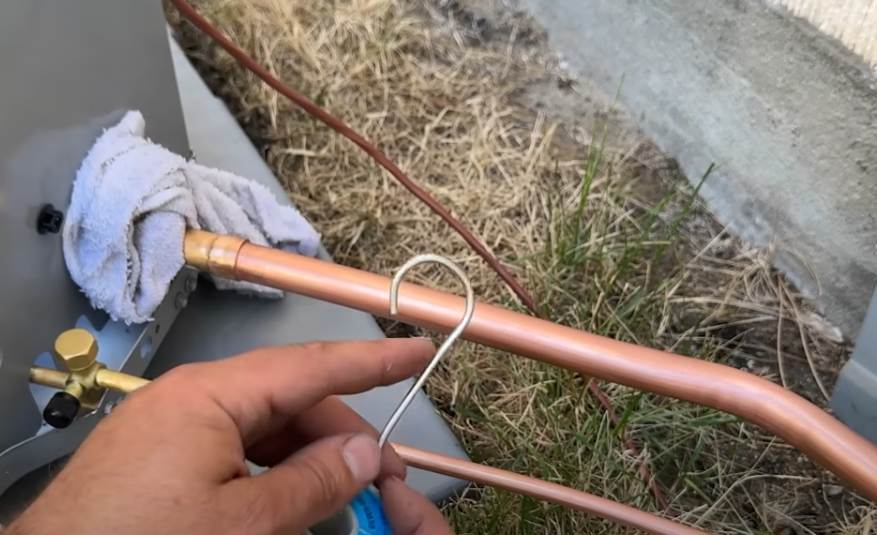
Another rule of thumb, they say, if you take and bend this around the pipe like so, you could mark this right here and know that this is about how much Stay Brite 8 you should use. But I usually do this by feel, and it’s never let me down.
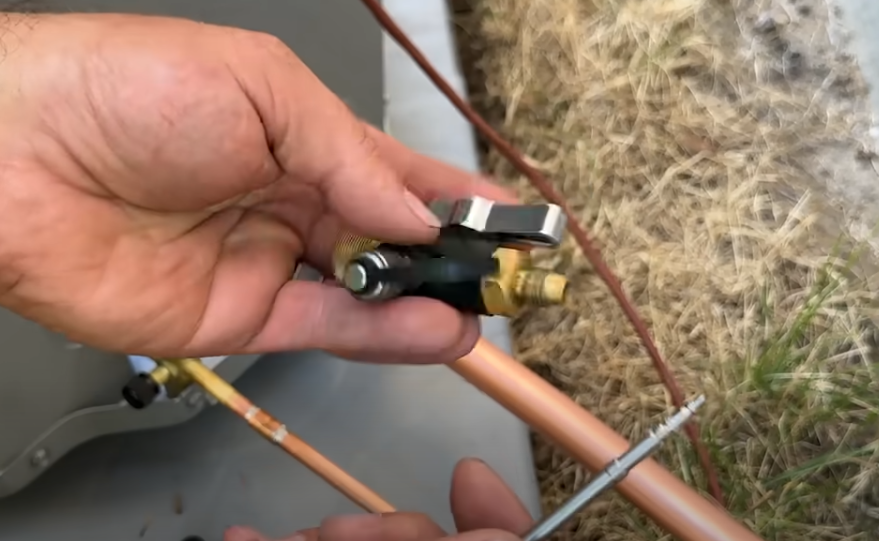
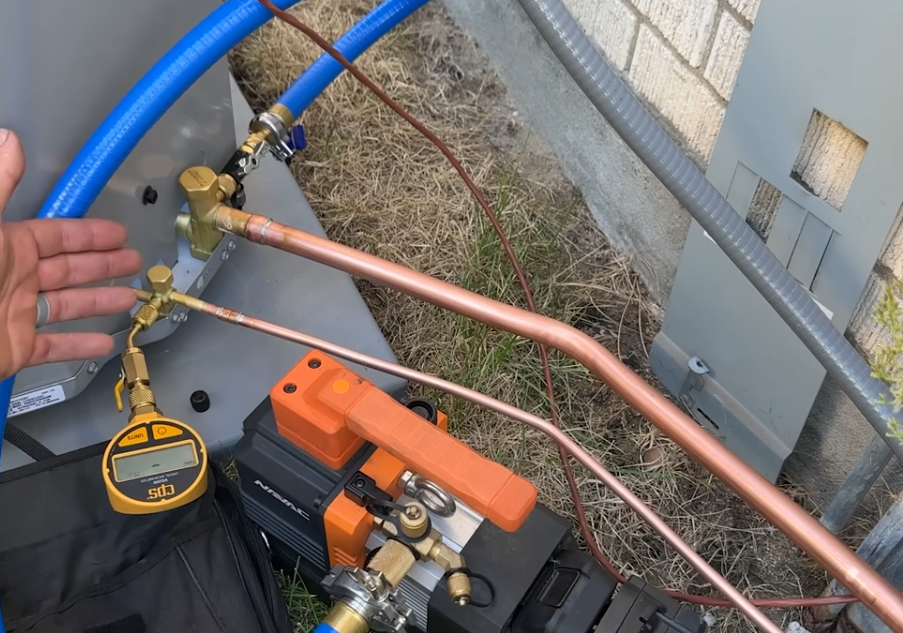
I’ll inspect this with a mirror and then get some nitrogen on it to do the pressure test. Now we’ll take out our valve core, and this is going to allow us to get the most nitrogen in the system, and this is also going to allow us to pull a good vacuum, instead of trying to pull a vacuum through a tiny little opening like this one, all of your vacuum would be pulled through these tiny little holes here otherwise. So we’re going to remove this and hook our valve core tool up, and then when we’re done, we can simply put the core back in with this tool. We’ll thread this on and hook our nitrogen up right to this port. Then we’ll hook our nitrogen up.
We have our nitrogen, and we are going to connect our yellow hose up to our nitrogen, and we’re going to put about 300 psi in the system. We’ll slowly throttle this in, and I usually stop around 50 psi to make sure that we’re not dropping significantly.

We’re at 51.4 I’ll give this about five minutes to make sure that it doesn’t drop significantly, that way we’re not going to throw 300 psi in it and then find out that we have a leak and then waste all of that nitrogen. Okay, so it’s been a few minutes. We’re still at 30, 51.4 I’ll go ahead and throttle in about 303 50 psi, and we’ll just make sure that everything holds. So we’ll give this a few minutes to stabilize.
You’ll notice the pressure dropping a little bit after you initially send it in, but after about five minutes, this will settle and stay at a certain point, and if it doesn’t continue to drop, then we know that we have passed our pressure test. So we settled at about 370 several minutes ago, and it’s been holding for probably the past 20 minutes. So we’re golden on our pressure test. So what we’ll do now is we’re going to close this, take our our hose off, and then we’re going to let this all out at once, and it’s going to do kind of like a nitrogen purge, and get out any contaminants In the lines, blast all of this air out.
Next, we’re going to pull out our vacuum. We’re going to be using this Navac battery-powered pump with a Milwaukee converter, but you can do this with a cheap $100 pump that you can find on Amazon. This expedites the process. We’re going to be using the true blue hose. It’s a large diameter hose, and it helps to pull the vacuum very quickly. We’ll just connect one end here on our core removal tool, and then we’ll connect the other end to our pump.
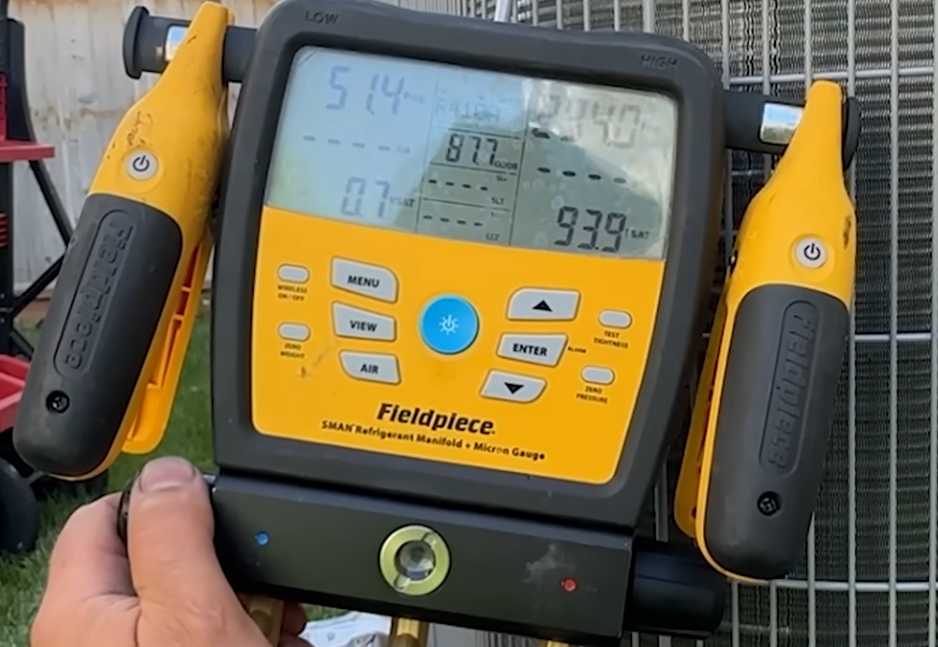
Now we’re going to put our micron gage on the high side. This is going to tell us exactly how much moisture we’ve pulled, and we’re after 500 microns or less. And again, you can find all of these products on our Amazon store. So we’ll simply turn this on and the pump. Once we have the vacuum pulled out of this hose, we’ll open this valve and start pulling down these lines. A common misconception that a lot of people have is that they think they have to add the refrigerant. But in reality, all of these units come pre-charged with enough refrigerant for about 15 feet. And so what we’re doing is pulling all of the moisture and contaminants out of these lines, and then once we’re done, we’re going to open these valves, and that’s going to let the pre charged refrigerant into the rest of the system, and then it’ll be ready to go. So we’ll open this valve, and you’ll notice this pitch change, which means that it’s now pulling the vacuum on these lines. And we’ll watch this meter, and as soon as we get down to 500 microns, we’ll do a decay test. And basically what that is, is we’re making sure that it’s staying at a certain level of removing that moisture, if it slowly raises, we have to pump it down a little bit more, but our target is to be below 500 microns and for it to stay there for at least five minutes, and then we’re good to go.
You can see we’re already at 20,000 microns and dropping pretty rapidly while we’re waiting for our system to pump down. I want to mention something about the nitrogen and all of these tools. A lot of people leave me comments saying you have to buy 1000s of dollars worth of tools, and it negates, you know, any savings. But the reality is that you don’t have to get this super expensive setup. I did this for a living, so I have nice tools. You don’t have to get super nice stuff, and you can still achieve the same thing. For all of these tools, you can expect to pay between $1000 and $1500, which is really a small number when you compare it to the seven to eight thousand that you could be saving. For nitrogen, I went to the air gas supply the other day and just asked them how much it would be if I just picked up a tank of nitrogen. Nitrogen is $10 per day. So it’s cheap to rent nitrogen, and it costs about 30 bucks to refill this tank. So definitely DIY friendly. Just look for a local air gas company, and you can get nitrogen there. As you can see, we’re at 300 microns, so we’ll go ahead and do our decay test. And all that is, is we’re going to isolate everything. We’re going to isolate the vacuum pump, and all of this will be under the same reading. So we’re holding at 290, go ahead and turn off our pump. As long as we hold and we don’t rise above 500 within five minutes, we’re golden.

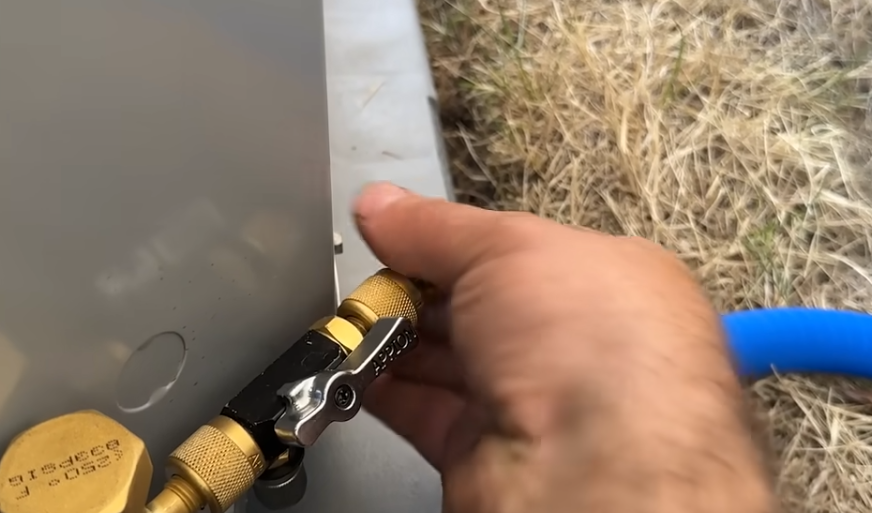
The last step is to remove these little caps, and we’ll unthread the Allen head valves in here, and then we’ll be ready to go. As you can hear, the contactor is pulled in, meaning that the fast stat and the thermostat are calling for cooling. So all we have to do is let the refrigerant in, turn our breaker on, and we’re good to go. So our breaker panel had some open slots here, so we’re going to just bust these out. And now we have a 30-amp breaker right there, and it’s within six feet, so we don’t have to have a disconnect. As long as we can turn that breaker off and service this unit, we are golden. So it’s been over five minutes. We’re still at 240 microns. So we’re good to open up these valves. Now, some people say to open and also we want to isolate this first, just so refrigerant doesn’t go into here. Some people say to open the suction line first. Others say to open the liquid. I don’t feel like it matters either way, as long as you let it set for 10 minutes or so, let the refrigerant stabilize, you should be good to start it up so and then there’s a stopper here. Don’t go too hard as long as it stops, you’re good.
We’ll just snug these up, and then we’ll hook our gauges up just to check the pressures. We might have to add a little bit of refrigerant to this system, but we’re probably five feet, more than 15, or maybe 10 feet, so it should be pretty minimal. We can disconnect our vacuum pump, and then we’re going to put our Schrader core back in. Show you how easy that is. So we simply feed it in, and then we slide this middle piece until it locks in. Then we thread the core back in, and once you feel a little bit of resistance, you know that it’s fully seated, and that’s it.
We’ll hook up our gauges and make sure that the pressures look good once we turn this on for the first time. That’s the beauty of these low-loss fittings, you don’t have that spurt of refrigerant. It makes connecting and disconnecting easy. So if you’ll notice, right here, we have about 230 – 260, give or take, and once we start the system up, we’re looking for about 130 and maybe 350 on the high side. So we’re pretty much ready to start it up. I’m also going to throw these on so we can check our sub-cooling and super heat, and we’ll show you that as well. All right, the moment of truth. It sounds great.

We’ll give this a minute to find its pressure. Typically you want to give it about 10-15 minutes to check the sub-cooling and super heat. That way, you give it enough time for the TXV to adjust and get a consistent reading.
Now, for the exciting part, we turn the cool on, we set it down to 70 degrees, and then you kind of sit back and watch the house cool down and monitor the temperature coming out of the vents.
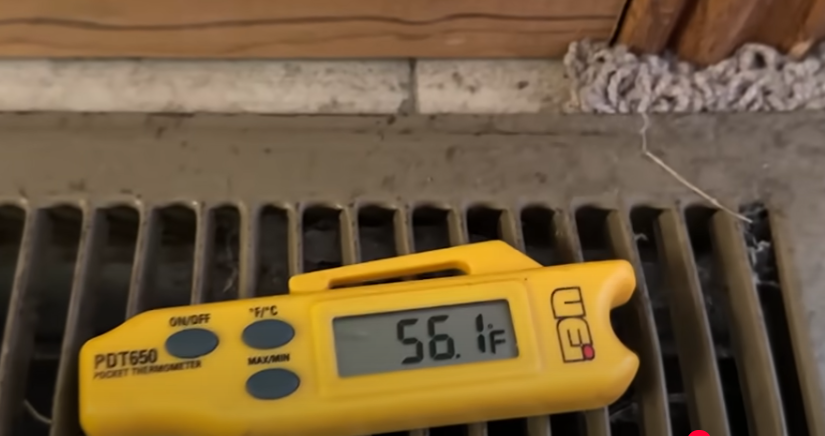
All right. So as you can see, it’s 85 degrees inside. And let’s show you what we’re blowing out of the vents here.
As you can see, we’re currently blowing 56 degrees. Typically, we want to have a 20 degree difference. So if we start with 85, we’re blowing closer to 30 degrees. So we’re getting a lot of cooling, and we’ll be able to dial this even further in with our refrigerant charge. But so far, it’s cooling perfectly. We’ve got nice cool air coming out of the beds. Pressures are looking really good, but as you can see, our sub cooling is low.
We want this to be about eight degrees. And so if you look at the front panel or the electrical panel here, you’ll see that our target sub-cooling is eight degrees. So that’s the number we’re after. But because there’s such a large heat load, as you saw, it’s 85 degrees in the house, we can’t really dial it in with the sub-cooling. So what we’re actually going to do is we’re going to weigh in the refrigerant for the scale. So these units all come pre-charged with 15 feet, 415 feet of line set. And so we installed a 30-foot line set, and we had about five feet additional, so we have 25 total feet. That means we need to add a charge or 10 additional feet. Now we’re going to add .6 ounces per foot, and that’s going to add up to six ounces that we’re going to have. So to start with, we’re just going to hook up our middle hose here, the yellow one to our tank.
Now that that’s tight, we’ll open it up, and we’re going to bleed all of the air out of these lines. So when we hooked up these hoses, a little bit of air got trapped right here, we’re just gonna bleed it out.
Gonna let a little spurt out. This one has a little bit of liquid in it, and that’s it. So all the air is out now.
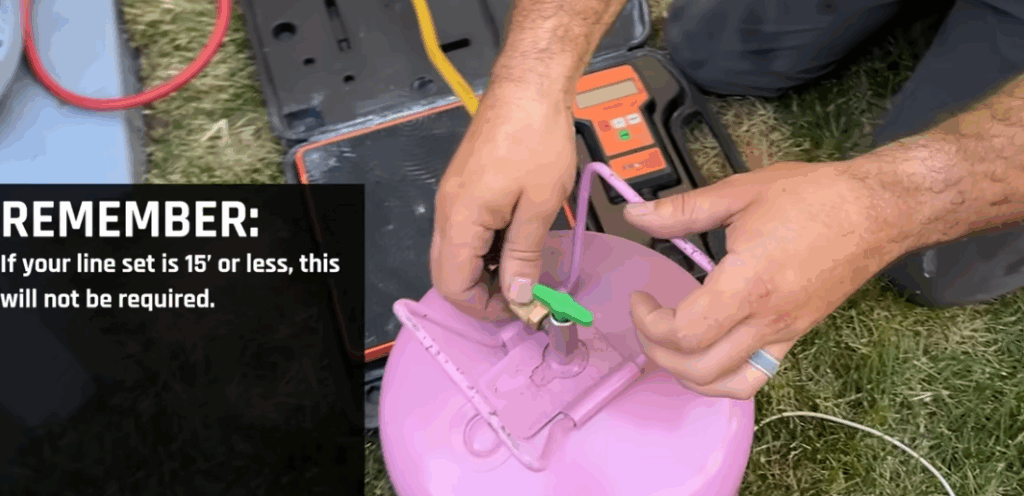
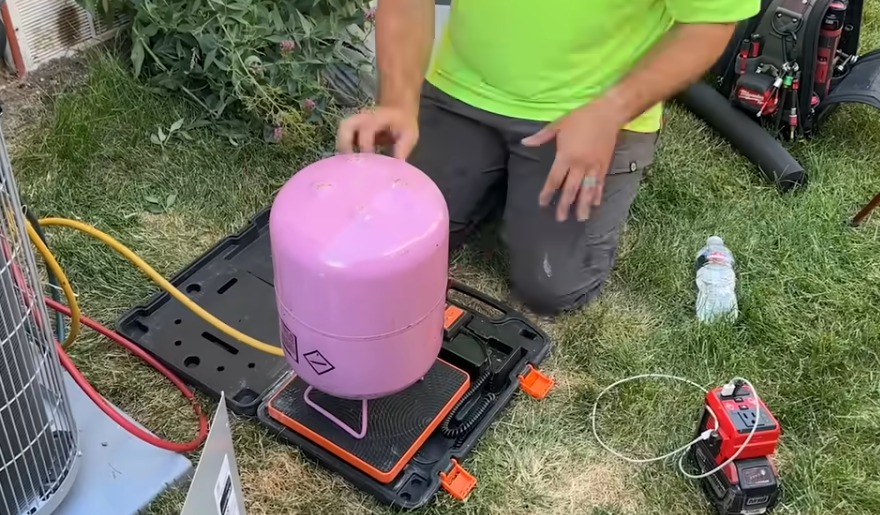
We’re going to flip this upside down on our scale, and over here on this screen, we’re going to turn it on and we’re going to zero it out. So right now, this weighs about 11 pounds. We’re going to zero this out, and we’re going to slowly start adding refrigerant through the low side, and we’ll notice this number going up. We’re going to go in slowly until we get to six ounces.
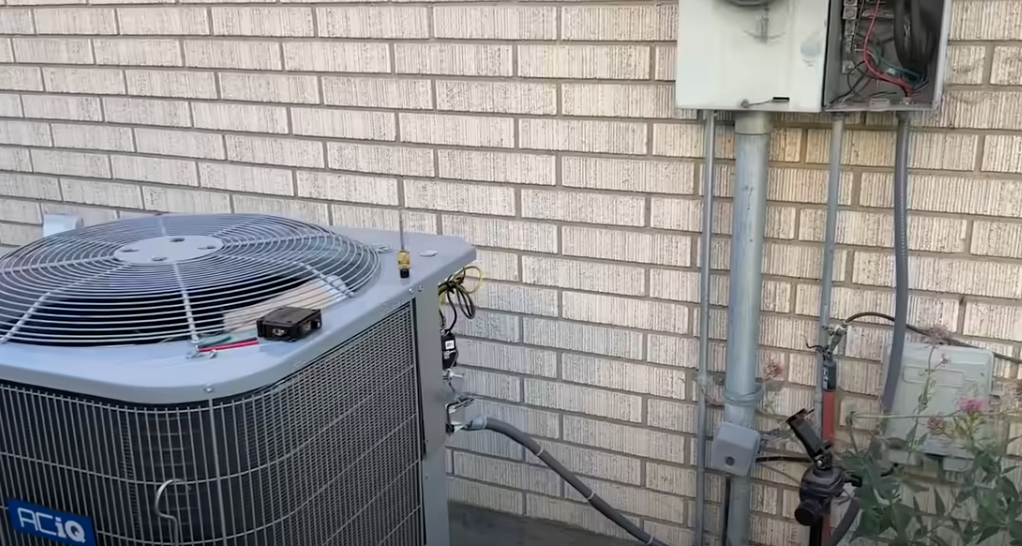
The fan is running, the condenser is on outside, and this line is nice and cold. Everything is insulated all the way up. We’ve got our filter dryer there, and this is our finished condensate drain going down under the water heater there, and that’s pretty much it for the inside. We have nice air flow. We made sure that the filter was brand new. It was just replaced, so you got plenty of air flow coming out of the vents. This system is ready to go.
We’ve got warm air coming out here, cold air coming out of the vents, and we’re good to disconnect our gauges, and this system will be completely done. This is the finished product, running beautifully, pulling tons and tons of heat. Icicles are coming out of the vents. Everything about this job turned out easy. Our line here is beer-can cold. Everything turned out nicely. Here we have a few items that Nils is going to wrap up for us.

The Big Reveal….
Be sure to watch the YouTube video at the 36:30 mark for the big reveal to my mother-in-law. She has lived in her house for 37 years. It will melt your heart.
Looking for Unique Ways to Transform Your Home Garage. Click HERE for all of the details.
Looking for the perfect gift for Dads or Grandpas? I Bought and Tested the Most Expensive Drills at Home Depot. Click HERE to see the results.