

I’ve got a lot of home and garden ideas to beautify your yard and add some summer fun. Here are some of my popular posts that you might like:
Essential Spring Landscaping Tips for Your Yard
4 Fun Outdoor Lighting Ideas for Landscaping
DIY Outdoor Projector Screen
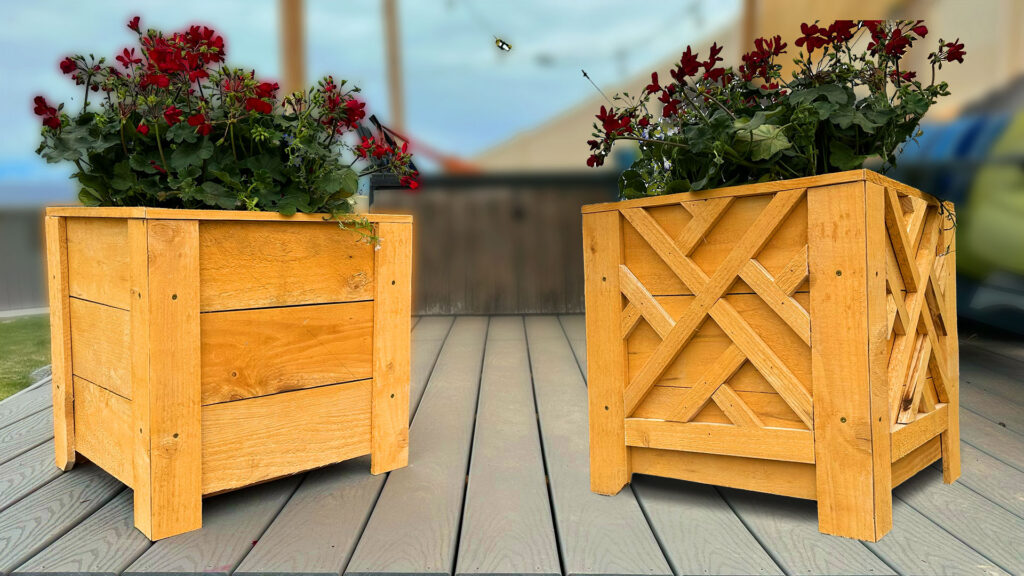
SMALL PLANTER BOX WOODWORKING PLANS
Get the detailed 12-page plans for building your own planter box here: https://lrn2diy-shop.fourthwall.com/products/small-planter-box-woodworking-plans
Let’s Dive In!
This entire project just requires 5 and a 1/4 Cedar Fence Pickets, measuring 5 1/2” wide by 6’ tall. Prices on these pickets are all over the place, but I’ve found that they’re often cheaper at the store than online. When I went to Home Depot, they were selling for $2.25 each, even though they were listed at $3.99 on their website, so be sure to check out your local offers on this. 6 of these cost $13.50. The only other lumber you’ll need is a 2×4, and you may want to use a pressure-treated piece since the planters are exposed to the elements. This 2×4 costs about $6, bringing our total to $19.50 plus tax. You’ll also need some outdoor screws, but this project doesn’t require a ton of them, fortunately.
Before you start cutting, I highly recommend giving your boards time to dry. In my experience, boards at the big box stores tend to be freshly cut and sopping wet. As these dry, they’ll shrink and potentially cup or warp, so the more you can control that beforehand, the better. I laid all of my pickets out in the sun in this pattern to allow both air and sunshine to dry them as much as possible. After a couple of days, they were much lighter and much drier.
Start out by cutting all of your pieces to size using either a circular saw or, if you have access to a table saw and a miter saw, that’ll make quick work of all of this. I have those tools, but I thought I’d show how easy it is to build this with just the two tools I mentioned. When using a circular saw for cross cuts, a speed square is incredibly helpful. These are just a few bucks and can help in all kinds of projects. Just mark your line where the cut goes, then hold the speed square up against the side of the board and slide it until the blade is lined up with your marker line. Circular saws have marks on the plate to make this easier. For longer cuts, I would normally use a cutting track, but that’s difficult on thinner pieces like these, so instead I used a straight edge to mark my lines with a sharp pencil and then slowly and steadily followed the line with the saw. You may need to look at either side of the blade, depending on the cut you’re making, so take your time and cut as straight as you can. You can see I’m using one of my foam insulation boards to cut on, which makes it easy to get all of the cutting done without damaging anything. Remember that the depth of your blade should be enough to not only cut through the board, but the gullet should protrude past the board as well. Gullets are designed to clear away the chips as you cut, so be sure to give them a bit of room. I’m also using my shop vac to help cut down on dust, but this is entirely optional. Pretty quickly, you’ll end up with a pile of boards like this.
I originally designed this planter box to only use straight 90-degree cuts, but I asked my wife what she thought, and she agreed that it’s worth making some 45-degree cuts to get those nicer-looking mitered corners on this. So the last cut to make involves setting your blade to 45 degrees, then measuring over 2 7/8” on the face of the board and drawing a line all the way down. Cut the board in half lengthwise using that 45-degree cut, and then cut those two boards in half and then in half again. These will be the outer corners and feet of the box.
When you’re ready to cut the 2×4, it’s really the same process. Make your marks, set your blade depth, and get cutting. We only need 8 pieces from the 2×4, so you’ll have some left over there as well.
To assemble the box, start by assembling your four sides of the frame. Remember to put the cut sides down as you assemble this so that the measurements all work out. I used two long screws in each corner to hold it together. I found a box of about 5,000 2 1/2” decking screws that I bought dirt cheap several years ago and it’s the gift that keeps on giving. If you ever come across a great deal on fasteners, snatch it up – you can never have enough screws. For this project, make sure to only use outdoor rated screws, otherwise you’ll end up with a compromised box, not to mention rust streaks. Next, attach your three floor boards using one screw each. These screws should be between 1 and 2 inches long. They don’t need much to hold in place because gravity will do most of the work here. I highly recommend pre-drilling each hole in this project, but especially the holes in your cedar, since that’s thin enough that it may want to start splitting if not pre-drilled. The rule of thumb for pre drilling is to use a drill bit that is as thick as the screw is minus the threads. When you hold a bit behind the screw, it should just barely disappear. That way the screw’s threads are doing all of the work and splits are much less likely.
With the floor and frame in place, the rest goes pretty quickly. Add three boards to each side. I designed the plans so that two sides are longer than the others, so they all fit together quite nicely. Be sure to keep the screws relatively close to the edge so they can be covered up with the corner pieces. To add said corner pieces, turn your box upside down and line up your 45-degree cuts for each corner. Having it upside down means that the box and the corners will all line up, making it easy to frame the top of the box when you’re done. Drive two screws into each board but make sure to space them such that they won’t hit the screws underneath. You’ll end up with two pieces that have the dog ears on them so it’s up to you if you want to cut new, non-dog-eared pieces out of the remnant of your fifth board or just leave it as is. Since mine are going in the grass, I wasn’t too worried about two of the eight pieces having a dog ear.
I’ve got a beautiful indoor DIY plant stand. Check out my $3 DIY Mid-Century Modern Plant Stand With Plans. Click HERE for all the details.
I’ve also got plans for a large planter box. Make a $23 Planter Box. Click HERE for more information.