
Several years ago I read a book called Makers, by Chris Anderson and he talked about how, in the future, we could all have 3D printers of our own and our homes would be like little manufacturing factories. Today, we’re seeing that happen around the world. It’s pretty incredible. A couple of years ago I got my first 3D Printer and it cost me about $650 and could print just about anything I wanted up to 150mm squared. I was pretty stoked but it was a real labor of love. Things broke, prints got messed up and I spent more time trying to get a successful print than I did actually making cool stuff.
More recently, Gearbest was kind enough to send me this Tevo Tornado, which currently only costs about $340 US and can print up to 300mm square by 400mm tall – that’s more than ten times the volume of my first printer for about half the price, plus it has a bunch of cool features that my first printer didn’t have. I’ll put a link in the description to the Tevo Tornado in case you’re interested in ordering one for yourself.
TEVO TORNADO Most Assembled Full Aluminum Frame 3D Printer: https://goo.gl/Fj9bTB
Use this coupon code at checkout: TornadoUS
More 3D printers from Gearbest!: https://goo.gl/6Js4y2
Makers: The New Industrial Revolution: http://amzn.to/2rhtiB8
12-inch Mirror Tiles (pack of 6): http://amzn.to/2DEIhrp
Hatchbox PLA Filament: http://amzn.to/2DbvCeh
Hatchbox WOOD PLAFilament: http://amzn.to/2raok9c
Sony PlayStation Eye Camera ($7.99): http://amzn.to/2FLJgqa
Sainsmart Flexible TPU Filament: http://amzn.to/2mF6Lsk
Tevo Tornado Owners Group on Facebook: https://www.facebook.com/groups/TEVO.Tornado.Owners
I spent some time getting all of my settings dialed in with my new printer but now that it’s optimized, it produces some beautiful prints and I’m lovin’ it. In addition to the bigger build volume, the Tevo Tornado has a heated bed, which means it can be used to print with more types of material and it also helps with getting a good print. It has a nice little menu on the controller that I can navigate through to start a print, check settings, cancel a print, level the bed and much more. I don’t need to be hooked up to a computer to do all that. It also has more universal parts, so replacement parts, mods and upgrades are all pretty inexpensive.
Now that I’ve been printing for a couple of years, there’s a lot I’ve learned and I hope that this list saves you some time and gets you great results faster. To make sure my list was well rounded, I polled some friends and fellow 3D printing nerds to see what they found most important to understand about 3D printing, so this list represents our collective thinking. Let’s get to it.
1. Bed leveling and the first layer squish
One of the biggest struggles with 3D printing is getting that first layer to stick properly. It’s all kinds of frustrating to have to try twelve times to get a print to even start off properly, and this all has to do with bed leveling. Bed leveling is just making sure your bed is completely flat and level, and that it’s the exact right distance away from the hot end, where the filament is extruded. Many printers today have a set of four screws that are easy to turn to adjust the height of the bed. Optionally, you can purchase an auto bed leveler kit that will either level the bed itself for you or, more likely, detect where the bed is and adjust the height of the hot end to accommodate for wherever the bed is.
It doesn’t take an auto leveler to get great results, though. You can level the bed manually and as long as you check it before each print, you can avoid the many issues that arise as a result of not having a properly leveled bed. The idea is that your first layer sticks to the bed, by not smooshing too hard down onto the bed, but also by making sufficient contact with the bed to really stick to it. It’s a bit of an art but once you know where that sweet spot is, you’re cookin’. I dare say that this is one of the biggest causes of failed prints, so it’s worth it to get it right.
2. Printing on Glass
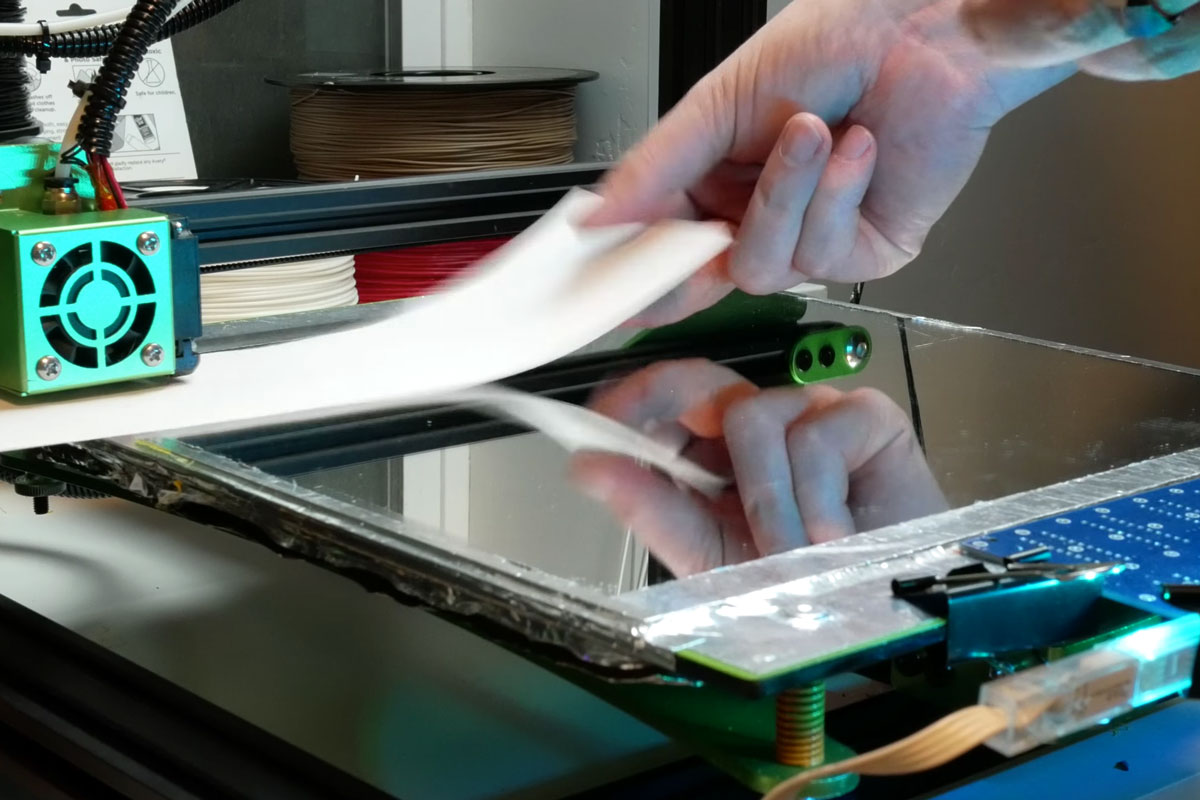
Different printers come with different beds. Most nowadays are heated and many are glass, metal or another hard material. One of my printers has a metal bed and uses a metal detecting sensor to figure out where the bed is. On my Tevo Tornado, however, I added a cheap 12×12 mirror tile and wow, it’s amazing to use. One of my favorite things about glass is that it leaves a super smooth, super solid bottom layer and it can be scraped clean with a razor blade. A quick tip here is to use a pack of straight edge razors from the dollar store. They’re a life saver and they make it easy to keep the bed clean and to pry prints off the bed when they’re done. I highly recommend printing on glass if at all possible. Next, let’s talk about how to make sure your printer sticks to the glass or any other surface.
3. Get Sticky
Getting your print to stick properly to the bed is a super important topic because if your print comes loose at any point during the print, your print is likely going to fail. There are dozens of ways to obtain proper adhesion so let’s talk about a few now.
- Painters tape – this is a super common one because the texture of the tape works well for adhesion. This also protects your bed and can be combined with other methods as well. You can buy large sheets of tape so that you don’t have to do row after row, or you can buy wider rolls of tape to save time.
- Glue sticks – I have used glue sticks quite a bit and they’re not only inexpensive but they work really well. One of the downsides is that they’re messy and require a good clean up from time to time.
- Hair spray – I use Aquanet hairspray for most of my prints. You can add it to the painters tape or you can spray it directly on the bed. There are other brands of hair spray that would work just as well but Aquanet is inexpensive and comes in a large can and really does a nice job.
- For ABS prints, it’s recommended that you pour a bit of acetone on the bed and then take some ABS (maybe from a failed print) and rub the bed with it. As it mixes with the acetone, it will leave a residue that serves as a great base for the printed ABS to adhere to.
4. Rafts, Brims and Skirts
In your printing preferences you’ll notice the option to select a type of build plate adhesion and you typically have four options: Raft, Brim, Skirt or nothing. The build plate adhesion serves several purposes. First is to give you a chance to make sure the filament is extruding properly before it begins on your actual model. This is super helpful as a test and can save a lot of wasted time and material. If this is your main goal, I suggest using a skirt. The second purpose is to help your model stay put on the bed. A brim is excellent for this. A brim adds several millimeters of material around your model that attach to both the model and the bed, helping to secure it in place during printing. You can easily adjust how wide the brim is and this can be the difference between a successful and a failed print.
The third purpose is to ensure a flat surface for the print and to make it easy to remove. A raft accomplishes these purposes by building a thick layer underneath the model that the entire model sits on top of. This makes it easy to remove the model and helps ensure a flat initial layer.
You can use different adhesion types at different times but the general rules are these: if you think warping may occur and your object takes up 25% or less of the bed, use a brim. If you’re concerned about warping or want to easily remove your object after it’s done, you aren’t concerned about the quality of the bottom layer, and your object takes up more than 25% of your bed, consider using a raft. Finally, if you’re not worried about warping and don’t need extra adhesion, but want to be able to verify that the print starts off properly, use a skirt. If you aren’t worried about warping, adhesion or checking that first layer, don’t use a build plate adhesion.
5. Understanding support
Support is another area I didn’t really get at first. Basically, support is just a way to make sure that layers that don’t touch the bed have something to build on when they’re ready to print. As an example, imagine the letter C. Only one small area of the letter C would actually touch the print bed – the very bottom of it. The rest of it needs support because if you try to print it without support, it’s essentially just trying to lay down filament in mid air, which is not going to work. It needs a layer to print on top off, and that’s what support does.
Support is typically easily removable and meant to last only as long as the print is in progress. Once the print completes, you should be able to break away the support and use a sharp blade to clean up any remaining trace of it.
There are two main types of support – touching the buildplate and everywhere. With ‘touching the buildplate’, support will only be built if it comes off of the printer bed directly. In the case of the letter C, the bottom half of the C would benefit from this but the top half would not, since the support in that case would have to be built on top of the bottom half (as opposed to the print bed). In the case of ‘everywhere’, as you can imagine, it’ll add support everywhere that it is needed – not just if it’s on the bed.
There are a lot of settings you can play with inside the support settings but typically the default supports will do the job.
6. Octopi to the rescue
Octopi is one of my top recommendations for anyone doing 3D printing. Here’s why. With Octopi / Octoprint, you can:
- Control your 3D Printer from another room or even another country. This means you can pause a print, start a print, cancel a print, check on a print, or just see what you’ve printed in the past. Very handy and offers a lot of peace of mind. Octopi is available on your local network from any machine on that network and can be made available outside the network by setting up a static IP address for your pi or by logging into a machine that’s on the network through a program like TeamViewer, which is available for Android, iOS, Mac and PC. Super handy and really easy to set up, also if you want to protect your network, there are services which help with this, so you can try these out so you make sure all your data is secured.
- Preview layers of a print. You can actually browse through each layer of a print before you start it to make sure it’s going to print in the way you expect. This is especially handy for when you take a larger print and scale it down. Often times the slicer doesn’t do a great job with that and Octopi will let you inspect how that turns out before you ever use a bit of filament.
- Untether your 3D Printer. The two default ways to print are to print from an SD card or to connect your printer to a computer via USB cable. With Octopi, the Raspberry Pi is the computer that you leave connected to the printer, so it frees up other machines in your house and bypasses the hassles of using the SD card. Very handy.
7. Keeping an eye on things
I bought an $8 webcam from Octopi and set it up by my printer. This way, I’m able to do real time monitoring, and I can do time-lapses. If something isn’t working and I’m not home, I can remote in to Octopi and cancel the print. This came in handy a few months ago, when I was in another state, and was trying to print a ukulele…which then basically exploded.
8. Materials Matter
PLA: Plastic that comes in all kinds of colors. There are different qualities of PLA as well. Junky PLA clogs theA nozzle regularly and is really frustrating to work with. Go with brand names you can trust- Hatchbox is clean and good. A spool of PLA fila ment costs around $15-30 for 1kg, which is about 300 meters. With slicer software like Cura, it will show you how much filament you’ll need (in meters) for a project. So project that takes 50 meters=6 of those per spool of filament.
TPU: This material is soft and flexible, so phone cases can be printed out of it, for example. The supports are more difficult to remove from TPU. Make sure to go with brands you trust for TPU as well. There are so many possibilities for printing with flexible material.
ABS: This is more finicky to work with, but it’s stronger and is resistant to outdoor elements. Being more difficult to work with, you need a heated bed, and I’d recommend an enclosure around the printer. The reason being, it’s sensitive to movements, changes in temperature, breezes, etc. Creating a consistent environment inside the 3D printer will give you the best luck. The most common problem with ABS is that it will easily warp on the bed. You’ll probably want to start with PLA before trying ABS, since it can be very frustrating.
Wood Filament: This is a mixture of wood and PLA. You can sand, stain and treat this like wood, especially if you have a solid piece. So cool! Imagine the possibilities!
9. Have a Little Help From Your Friends
Having support from others who print is very helpful. I’m part of a Facebook group called TEVO Tornado Owners. It’s a very active group where people share their successes and failures and offer tips and advice. Talk to others who have the same printer as you, and have/had the same issues and questions as you, especially when you’re getting started. There are also 3D printing forums, blogs and websites.
10. Ironing
Ironing is an option in Cura and slicing software. On the top layer of your print, it runs a heated hot end over the top of the surface without extruding any material. This makes melts everything nice and smooth on the top and makes it look like it was printed on glass. Enable the iron setting on Cura. It does add up to a few hours onto the print time.
11. Print Profiles
Slicing software comes pre-loaded with different profiles. Example: PLA and coarse. I like to tweak things like speed and travel speed, resolution and temperatures. Depending on material and the quality I’m after, I’ll use different settings. Once I get those settings dialed in, I’ll save it as a profile, which allows me to use it on another print later. I can also use it as a starting point and make my tweaks from there. That way, I don’t have to remember everything I’ve ever done. Name it with a descriptive name to make it easier.
12. Slicing Matters
All of the settings can be daunting.
- Check out retraction settings if you’re getting strings.
- Speed is a big deal. If layers are adjusting, or it’s doing a sloppy job, consider slowing down the speed to make it more accurate. The greater the speed, the higher the chance of a failure.
- Play around with temperature settings for the bed and the hot end. Make sure they’re set according to what material you’re using. A good starting point for PLA is 220, and 60 for the bed. Adjust from there.
13. This is a hobby. Be patient
3D printing is super cool, but it can be really frustrating. Approach it knowing there will be lots of failures and learn from them. It’s going to take time to get good at it. Have fun with it, and don’t let failures ruin your day or make you kick the dog.
What tips do you have? Please leave a comment below and share. Want to watch the video for this article? Check it out at https://youtu.be/Sqh3FM12KVg.
My question is FOOD GRADE filament eg PET, PETG, &/or PETT. I want to create “dishes” plates, cups, etc.
I’ve read you need to coat the print with a food grade polyurethane (to cover the layer lines).
What brands do you recommend, and how to apply. Do you have a video on this subject or will make a video.
Thank you for your time in this matter.
Rover
P.S. get mug.zip file https://www.thingiverse.com/thing:216063 (tried sending)
That’s a great question. I haven’t looked into food safe printing before but it’d be fun to try it, especially on printers large enough to print plates and such. Out of curiosity, what would be your motive in creating your own dishware vs buying? It’s not likely less expensive than buying so I’m guessing it’d be to create customized dishes? Maybe something branded or something one-of-a-kind?
At any rate, I’ll have to look into it. It’d be pretty neat to have themed or one-off dishes for parties and such.
Actually I want to make 6 different coffee mugs for a non-profit Radio station 2 different shows each mug will have the picture of the person and printing on the outside (like a lithograph). eventually I’ll make 3/4 sized one (PLA as example) as “premiums” for those two shows. The Hosts I want them to have usable ones.
As of 1/26/18… the mirror tiles total $31.00 … So I assume this is an old video
It’s actually pretty new still but it’s cheaper to buy the mirror tiles at the local hardware store than it is to order them online, probably because shipping costs are somewhat built into the online sale. I purchased mine just few months ago for $10 locally.
Instructions anywhere about how to set up the Raspberry Pi with the 3D printer? I have a Creality CR-10, which seems VERY similar to your Tevo…
There are step by step instructions on the Octoprint website.
Of course, I’ve heard about 3D printers but I have never used one.
You talked about support. But I still don’t get it. How can you support something you’re creating with this printer from top?
By the way, what do you print with this printer?
And thank you for the information!
Hi I already asked this but in the wrong place.
Total nuwb to 3d and yet to take the leap but out of curiosity, what stops the thing your making being a part of the raft and how do you detach it?