
Fix your car’s AC fast with this easy DIY guide—perfect for quick auto AC repair, recharge tips, and troubleshooting common air conditioning issues at home. Learn how to restore cool air in just 5 minutes with simple tools and step-by-step instructions.
I’ve got so many DIY Projects that you will be excited about. Here are a few of my favorites:
How To Build A Treeless Treehouse Part 1 – Footings and Deck.
4 Fun Outdoor Lighting Ideas For Landscaping
Healthy Lifestyle: Tips for Growing Your Own Fruit
don’t have good air conditioning in your vehicle, it can be pretty rough.
When my A/C stopped working on the left side of my car, I knew it was time to recharge it. Recharging your A/C is an easy process and takes five or ten minutes. Here’s how it’s done.
1. Turn Your A/C on High for 3-4 Minutes
Put your A/C on all the way cold, recirculating, and the highest setting. Let it run for 3-4 minutes at least before proceeding to the next step. This ensures that your system will be attempting to draw the refrigerant through the pipes, which is what we want.
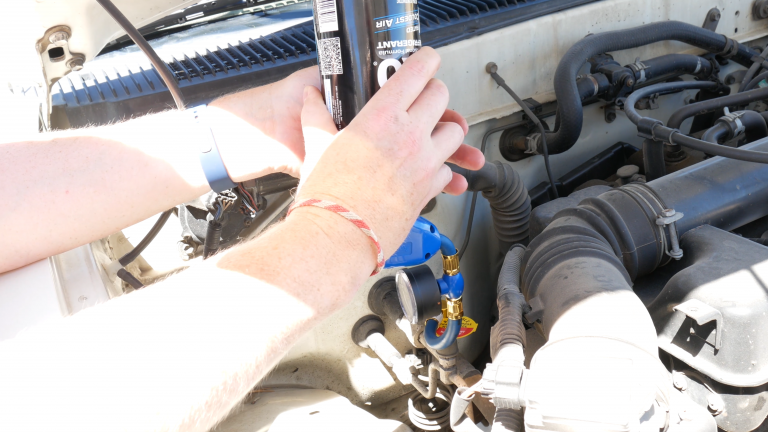
2. Locate Your Low-Pressure Service Port
Every vehicle that has air conditioning should have a high-pressure and a low-pressure a/c service port. They’re typically aluminum tubes, one thicker and one thinner. They also have removable caps on them labeled with an ‘H’ and an ‘L’ respectively. Locate the low-pressure service port and remove the cap. It should either thread off or just pop off. Be sure to put it somewhere safe.
3. Use the A/C Gauge to Determine Your Current Pressure
The refrigerant you purchased should have come with a pressure gauge. The adapter on the end is identical to that of an air compressor hose. Pull up the collet and attach the adapter to the low-pressure port. You should get a reading on your gauge. If you’re almost out of refrigerant, or very low, you’ll likely get a reading between 0 and 15 PSI. That means it’s time for a recharge. If, however, your reading is in the blue zone (typically above 30 PSI), you might not need refrigerant and may have a different issue altogether. Be aware that overfilling your refrigerant can be harmful to your system and may cause the same lack of cold air as an under-pressured system.
4. Shake it up!
Once you’ve determined that you need more refrigerant, start shaking the can. Its contents need to be well agitated to mix up the settled contents. Keep shaking throughout the next steps as well.
5. Fill It to the Appropriate Level
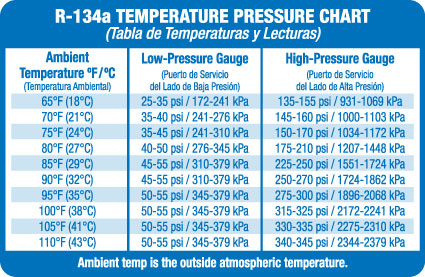
Check the included chart to determine what PSI you need to be at, which is determined by the outside/surrounding temperature. If you’re in a room temperature garage, for example (70 deg. F), then you’ll need your low pressure to be at 35-40 PSI. If it’s 100 degrees out, you’ll need to be up at 50-55 PSI. Keep moving the can horizontally and vertically as you squeeze the trigger to pressurize the system. Be sure to stop from time to time to check the pressure level so as not to overfill it.
That’s it! You should have functioning A/C again – woohoo! If you’ve been without it on a scorching hot day and then get it fixed, you know what a joyous occasion this can be. In this case, I was working on my Dad’s old truck, and he had never had A/C in it since he bought it a couple of years ago. You can imagine how pleased he was to feel the ice-cold air blowing out of the vents. Summers are suddenly much more bearable!
A Few Tips
- The symptoms for low refrigerant pressure are varied and can include:
- Warm air is coming out of the vents when the A/C is on
- Cool air, but not as cold as it should be
- A/C only working on one side of the vehicle or certain vents
- Pressing the A/C button doesn’t seem to have any impact on the air temperature
- If there’s a bit of refrigerant still left in the can, you cannot remove the nozzle and use the can again. You must use it all in one shot, or at least without disconnecting the hose, or else the remainder of the refrigerant will leak out.
- The hose and gauge of the refrigerant can be reused. The hose and gauge seen in this video are the ones I bought for my car and then used on my Dad’s car, so he just has to buy the bottle, not the bottle, hose and gauge.
Happy recharging!
Ready to watch the video to see it in action? Check it out.
Bees are essential to our environment, and they are dwindling. Check out my post Simple Ways To Make Your Yard Bee-Friendly. Click HERE for all the details.
Summer is a good time to get prepared for the winter months ahead. I have a post titled Tips To Prepare Your Home For The Winter Months. Click HERE to read all about it.